Tuesday, February 28, 2006
Photoshop 80-20 Rule
Believe me, I'm no expert in Photoshop, but I've found that like many things in life, there is an 80-20 Rule that seems to apply. That is, you can get 80 percent of the benefit out of Photoshop by using 20 percent (or less) of its considerable array of tools.
Here is an example of that - Except for cropping, it's the first series of steps that I use on a .jpg file out of my camera. It only uses two tools, Levels and Unsharp Mask, and takes about two minutes if you do it slowly. But it really has improved the look of my images.
Now I happen to use Photoshop 4.0, a "ligher" version of Photoshop, but the same steps apply to honest-to-gosh Photoshop.
You can see the difference between the last two photos above. In the final photo, I applied Local Contrast Enhancement.
If you'd like to learn more about why this works, there is a good article here on the Luminous Landscape website.
Depending on what I'm going to do with the image (i.e., display it on the web or print it,) I usually do some "normal" sharpening as a final step, again using the Unsharp Mask.
I hope you find these few simple steps useful. I'll try to add some more Photoshop tips over the next few weeks. But if what I've shown you today isn't a great example of the 80-20 rule, I don't know what is.
Here is an example of that - Except for cropping, it's the first series of steps that I use on a .jpg file out of my camera. It only uses two tools, Levels and Unsharp Mask, and takes about two minutes if you do it slowly. But it really has improved the look of my images.
Now I happen to use Photoshop 4.0, a "ligher" version of Photoshop, but the same steps apply to honest-to-gosh Photoshop.
 | Here is an image that, except for cropping, came right out of my Canon A620. I took it through the window of a tailor shop on Tenth Avenue in NYC on a cloudy day. The color balance is off - too blueish- and the image just has no snap - it's as dull as the weather outside. |
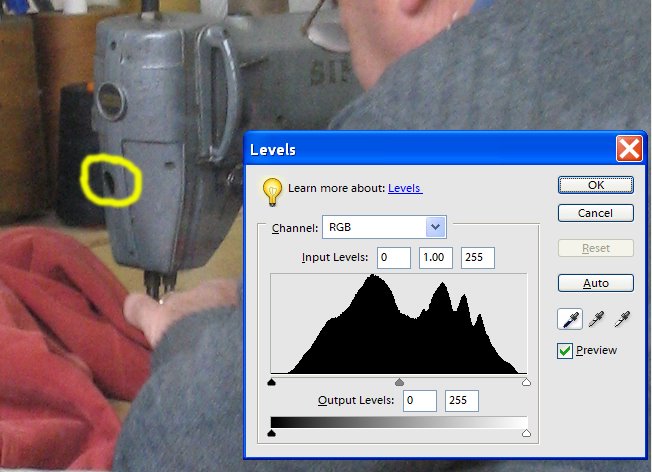 | The first thing I did was to bring up the Levels dialog (CTL-L). What I want to do now is key Photoshop into the blackest black in the image. To do that, I selected the Black Point eyedropper (the one on the left) and clicked it on that black patch (I think it's a hole) on the sewing machine. |
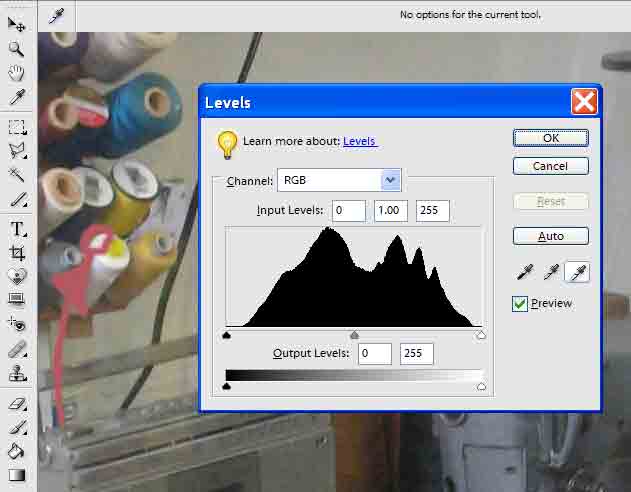 Next, with the Levels dialog still open, I picked the White Point eyedropper (the one on the right) and clicked it to what I wanted to be the whitest white in the photo - in this case, the top of a white spool of thread. Next, with the Levels dialog still open, I picked the White Point eyedropper (the one on the right) and clicked it to what I wanted to be the whitest white in the photo - in this case, the top of a white spool of thread. | |
 | Before I closed the Levels dialog, I picked the Gray Point eyedropper (the one in the middle) and clicked it on something that should be medium-gray, in this case, the tailor's sweater. |
| I've repeated the original photo again here, so that you can easily compare it to the color-corrected image below. |
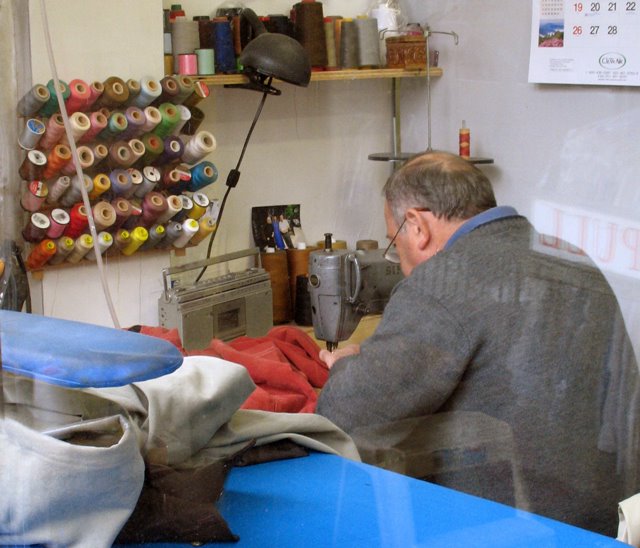 | Here is the color-corrected image that results after setting the black, white, and gray points and clicking OK in the Levels dialog. Compare this image to the original. Note the skin tones seem about right, and the overall bluish cast is gone. Also, the overall contrast is much better - it's as if you stripped a layer of dirty transparent film off of the photo. |
 | At this point, I usually do something that I recently found on the excellent website Luminous Landscape - it's called Local Contrast Enhancement and it's dead simple, but I find it makes a big difference. Using the main menu, select on Filter/Sharpen/Unsharp Mask, which brings up the Unsharp Mask dialog. Select an Amount value of 20, a Radius value of 50, and a Threshold value of 0 (zero.) Before you close the dialog, click the Preview checkbox on and off a few times to see the effect. This technique adds a lot of snap to an image with almost none of the adverse affects of sharpening. |
You can see the difference between the last two photos above. In the final photo, I applied Local Contrast Enhancement.
If you'd like to learn more about why this works, there is a good article here on the Luminous Landscape website.
Depending on what I'm going to do with the image (i.e., display it on the web or print it,) I usually do some "normal" sharpening as a final step, again using the Unsharp Mask.
I hope you find these few simple steps useful. I'll try to add some more Photoshop tips over the next few weeks. But if what I've shown you today isn't a great example of the 80-20 rule, I don't know what is.
Comments:
<< Home
This is so well done, Steve, that I have printed it out and will study it carefully. I'm sure it will come in handy immediately, if not sooner. And yes, I'll be sure to read all your PS tips to come. I'm learning as I go!

I have seen pages & pages of text on this subject by many authors. So far no one has come close to what you have done in a single page with clarity & outstanding illustrations. Excellent work
Ginnie & Larry - thank you very much for your kind feedback. I'll try to post some more tips like this soon.
Post a Comment
<< Home
![]()


